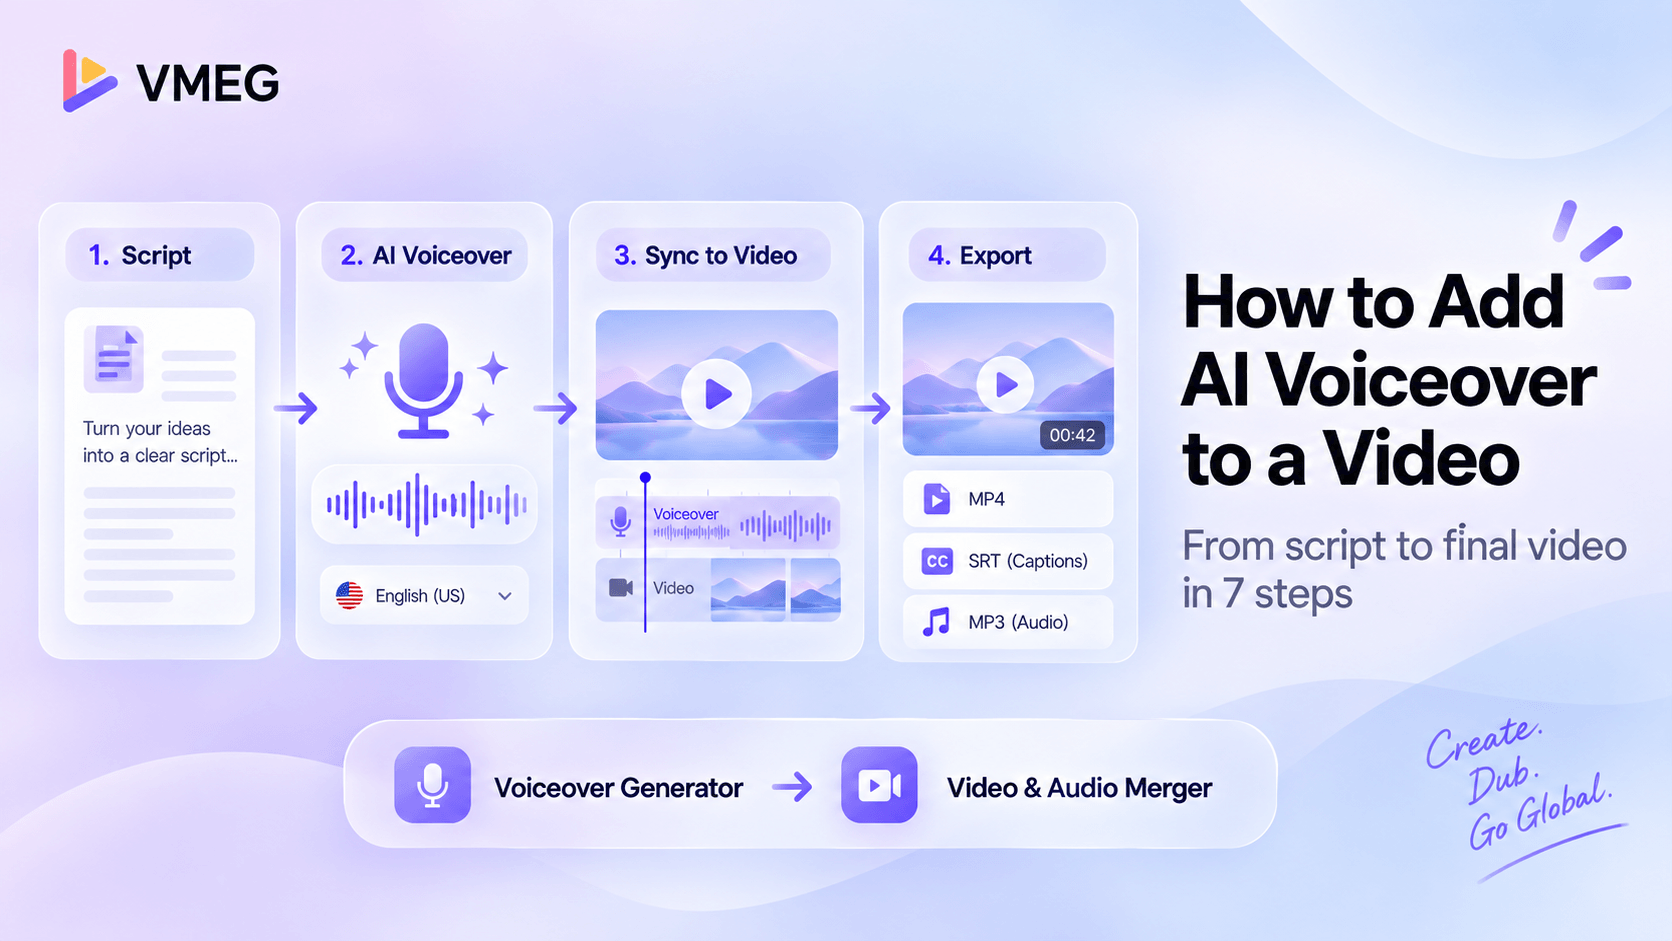
To add an AI voiceover to a video, prepare a script, generate the narration with an AI voice tool, add the audio track to the video, synchronize it with the visuals, balance it against music or original sound, review the result, and export the final video. The process can be completed inside an all-in-one video editor or by creating the voice track separately and importing it into a timeline.
The important distinction is that an AI voice generator may create only an audio file. It does not always render the finished video. A complete workflow therefore covers both voice creation and final video assembly. This guide explains each stage, including how to handle the original audio, fix timing problems, add captions, and review the result before publishing.
- Adding AI voiceover usually involves two stages: generating the narration and combining it with the video.
- Set the runtime and write for listening before choosing a voice; a polished voice cannot rescue an overcrowded script.
- Decide whether to keep, lower, or remove the original audio before mixing the new voice track.
- Review pronunciation, pacing, synchronization, audio balance, captions, and voice rights before publishing.
AI Voiceover, AI Dubbing, or Voice Changing: Which Do You Need?
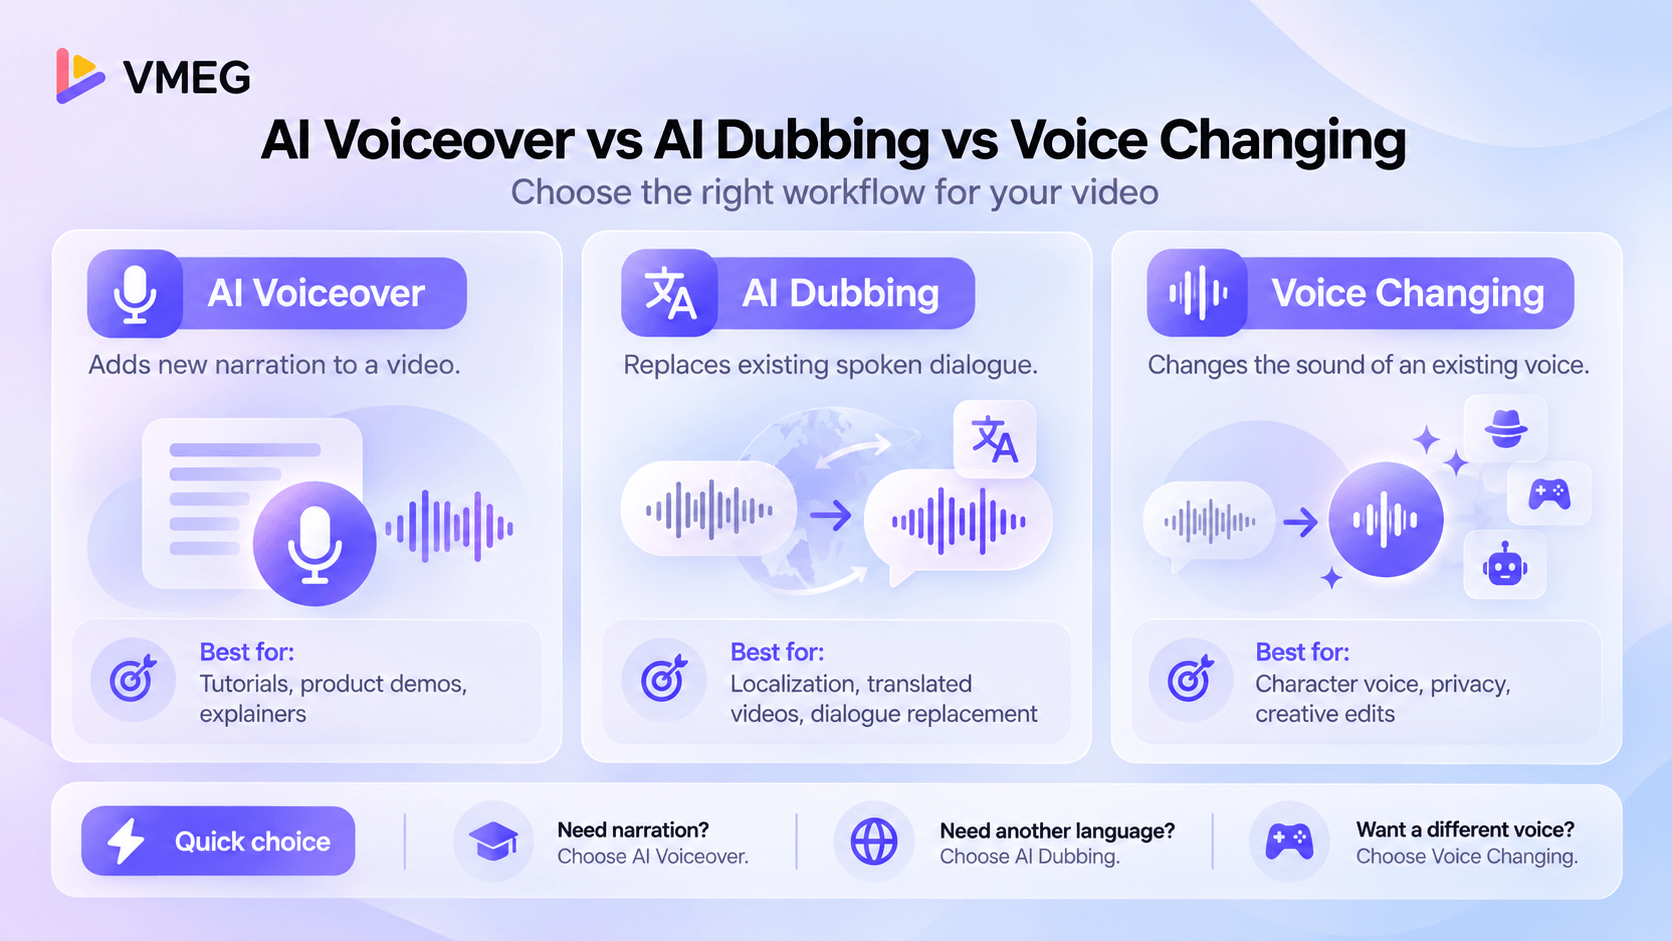
The phrase “add AI voice to video” can describe three different jobs. Choose the correct workflow before you write or generate anything, because each one treats the existing speech differently.
AI Voiceover Adds Narration
AI voiceover creates a new narration track from a script. It works well for silent footage, screen recordings, product demonstrations, explainers, courses, slideshows, and B-roll. The voice explains what viewers see without pretending to be dialogue spoken by a person on screen.
AI Dubbing Replaces Existing Dialogue
AI dubbing replaces spoken dialogue, often in another language. It may involve transcription, translation, speaker assignment, timing, voice cloning, and optional lip sync. If your goal is to translate a presenter or replace character dialogue, follow an AI dubbing workflow rather than a narration-only process.
Voice Changing Modifies Existing Speech
Voice changing keeps the words and timing of a recording but alters how the speaker sounds. It can support character voices, privacy, gaming, or creative edits. It is not the same as creating a new voiceover script.
Your goal | Best workflow | Typical content |
Add new narration | AI voiceover | Tutorials, demos, explainers, silent footage |
Replace spoken dialogue | AI dubbing | Translated videos, presenters, interviews, entertainment |
Change an existing recorded voice | Voice changing | Characters, privacy, gaming, creative effects |
Before You Start: Make Three Decisions
Should the Voiceover or Video Come First?
For explainers, courses, and product stories, a voiceover-first workflow is often easier: approve the script and narration, then cut the visuals to match. For an existing tutorial, screen recording, or social clip, the video comes first, so the script must fit its available scenes.
Neither order is universally correct. What matters is selecting one timing reference. If both the edit and narration keep changing independently, small differences accumulate and the final minute becomes difficult to synchronize.
What Should Happen to the Original Audio?
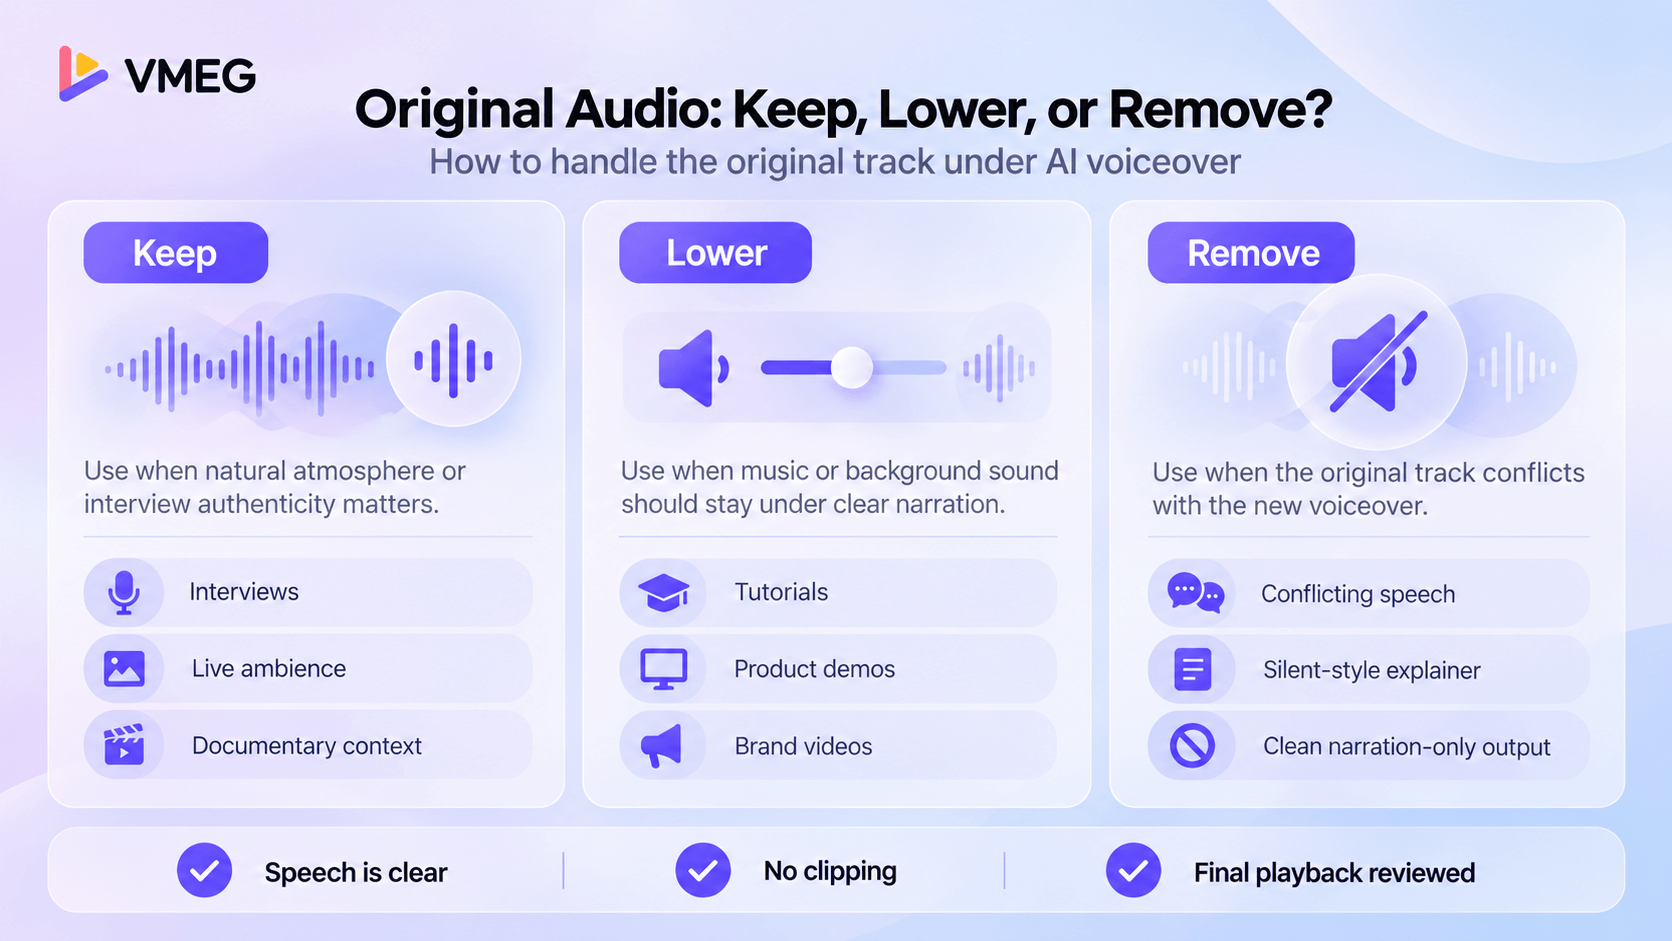
Listen to the source before generating the new track. Decide whether the original sound contributes useful atmosphere or competes with the narration.
Audio choice | Use it when | Watch for |
Keep | Natural ambience, interview presence, or documentary context matters | Competing speech and sudden changes in loudness |
Lower | Music or background sound should remain under clear narration | Music masking consonants or becoming distracting between lines |
Remove | The source track conflicts with the new voice or is not needed | Losing useful effects or making the video feel unnaturally silent |
Do You Need One Voice or Several?
A single narrator creates consistency across tutorials and training libraries. Multiple voices can clarify speakers, roles, or sections, but they also add casting and review work. If you use a cloned voice, confirm that you have the speaker’s consent and the rights required for the intended channels, regions, and duration.
A quick VMEG route is to generate the narration in VMEG AI Voiceover Generator, download the MP3, and combine it with the video. The detailed workflow appears below.
How to Add AI Voiceover to a Video in 7 Steps
The same production sequence works whether you use a voice generator and a separate editor or an editor with built-in text to speech.
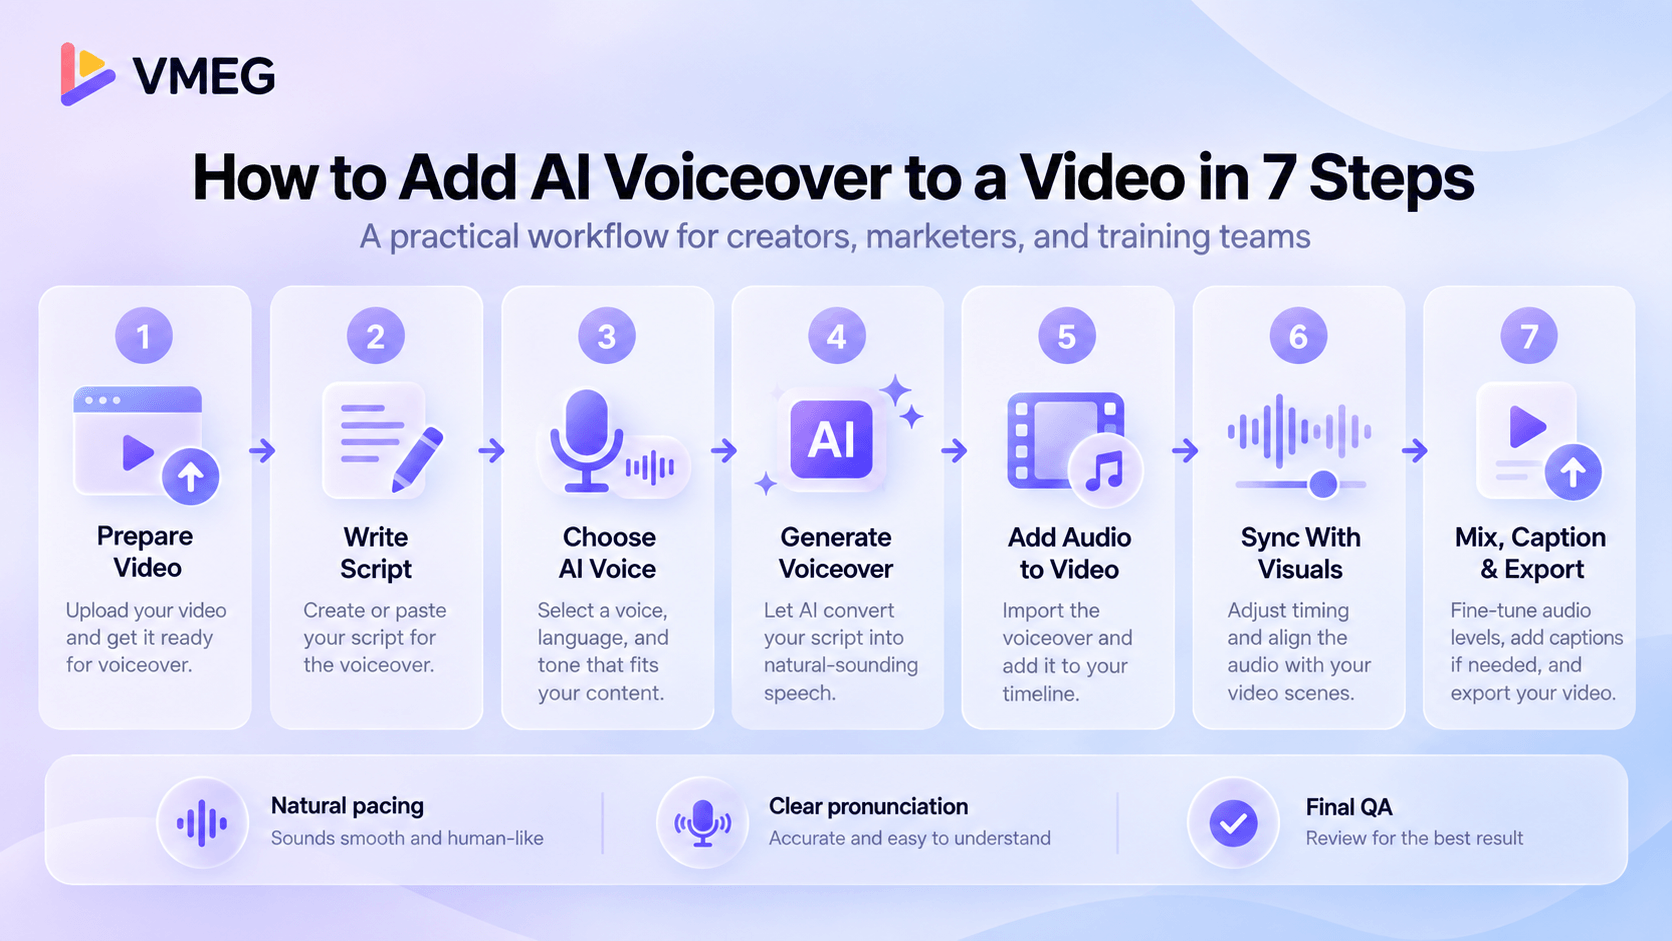
Step 1: Prepare the Video and Target Runtime
Confirm the final aspect ratio, approximate duration, publishing channel, and whether the source sound should stay. Watch the complete footage and note scene changes, on-screen actions, title cards, and moments that need silence. These cue points give the script a structure.
Do not write to the raw file length if you still plan to remove pauses or rearrange scenes. Use the intended final edit as the timing reference.
Step 2: Write a Script for Listening, Not Reading
Use short sentences, familiar transitions, and one idea at a time. Spell acronyms, numbers, URLs, and unusual names in the way they should be spoken. Add punctuation where the voice should pause, not simply where a written paragraph would place it.
Estimate the word budget using the tested pace of your chosen voice:
Target word count = desired duration in minutes × tested words per minute
Generate a short sample to measure the actual delivery. Voice style, language, pauses, and sentence complexity can change the result, so a fixed words-per-minute rule is only a starting estimate.
Step 3: Choose the Language and AI Voice
Select the correct language and regional accent before auditioning voices. Compare complete sentences rather than one-word samples. A voice that sounds impressive in isolation may become tiring over a ten-minute lesson or may not suit the audience.
Match the delivery to the job: clear and neutral for software training, warm and steady for education, concise and energetic for short-form video, and controlled rather than exaggerated for technical or regulated content.
Step 4: Generate and Review the Voiceover
Generate the voice track, then listen without watching the video. Correct names, product terms, abbreviations, numbers, and unnatural emphasis first. Next, listen while watching the footage and mark lines that feel early, late, rushed, or disconnected from the visual action.
Fix the smallest unit possible. Rewriting one crowded sentence usually produces a more natural result than accelerating the entire narration.
Step 5: Add the AI Voice Track to the Video
If the video editor includes text to speech, save the generated voice to its timeline. If you used a separate voice generator, download the audio and import it as a new track. Official tools such as Microsoft Clipchamp support both text-to-speech generation and imported audio; other editors use a similar timeline model.
Start the voice at the intended first visual cue rather than automatically placing it at 00:00. An opening logo, establishing shot, or title may need a short pause.
Step 6: Synchronize the Voice With the Visuals
Split the narration into sections and align each section with the relevant scene. Use clicks, cursor movement, text appearing on screen, product actions, and transitions as cue points. Leave enough room after key instructions for viewers to process the picture.
If a line does not fit, shorten the wording or extend the visual before increasing speech speed. Natural pacing matters more than forcing every sentence into its original slot.
Step 7: Mix, Add Captions, and Export
Balance narration against music and remaining source sound. Listen for clipping, abrupt starts, cut-off words, background noise, and volume changes between sections. Add captions from the approved script, then check that edits made to the audio also appear in the captions.
Export a short test before rendering a long project. Confirm that the chosen video format includes the new audio track, then review the complete final file on at least a phone and headphones or speakers.
How to Add AI Voiceover to a Video With VMEG
VMEG separates voice creation from simple video-and-audio assembly. This makes the output of each stage clear: the Voiceover Generator creates the narration file, while the Video and Audio Merger combines separate media tracks into a finished video.
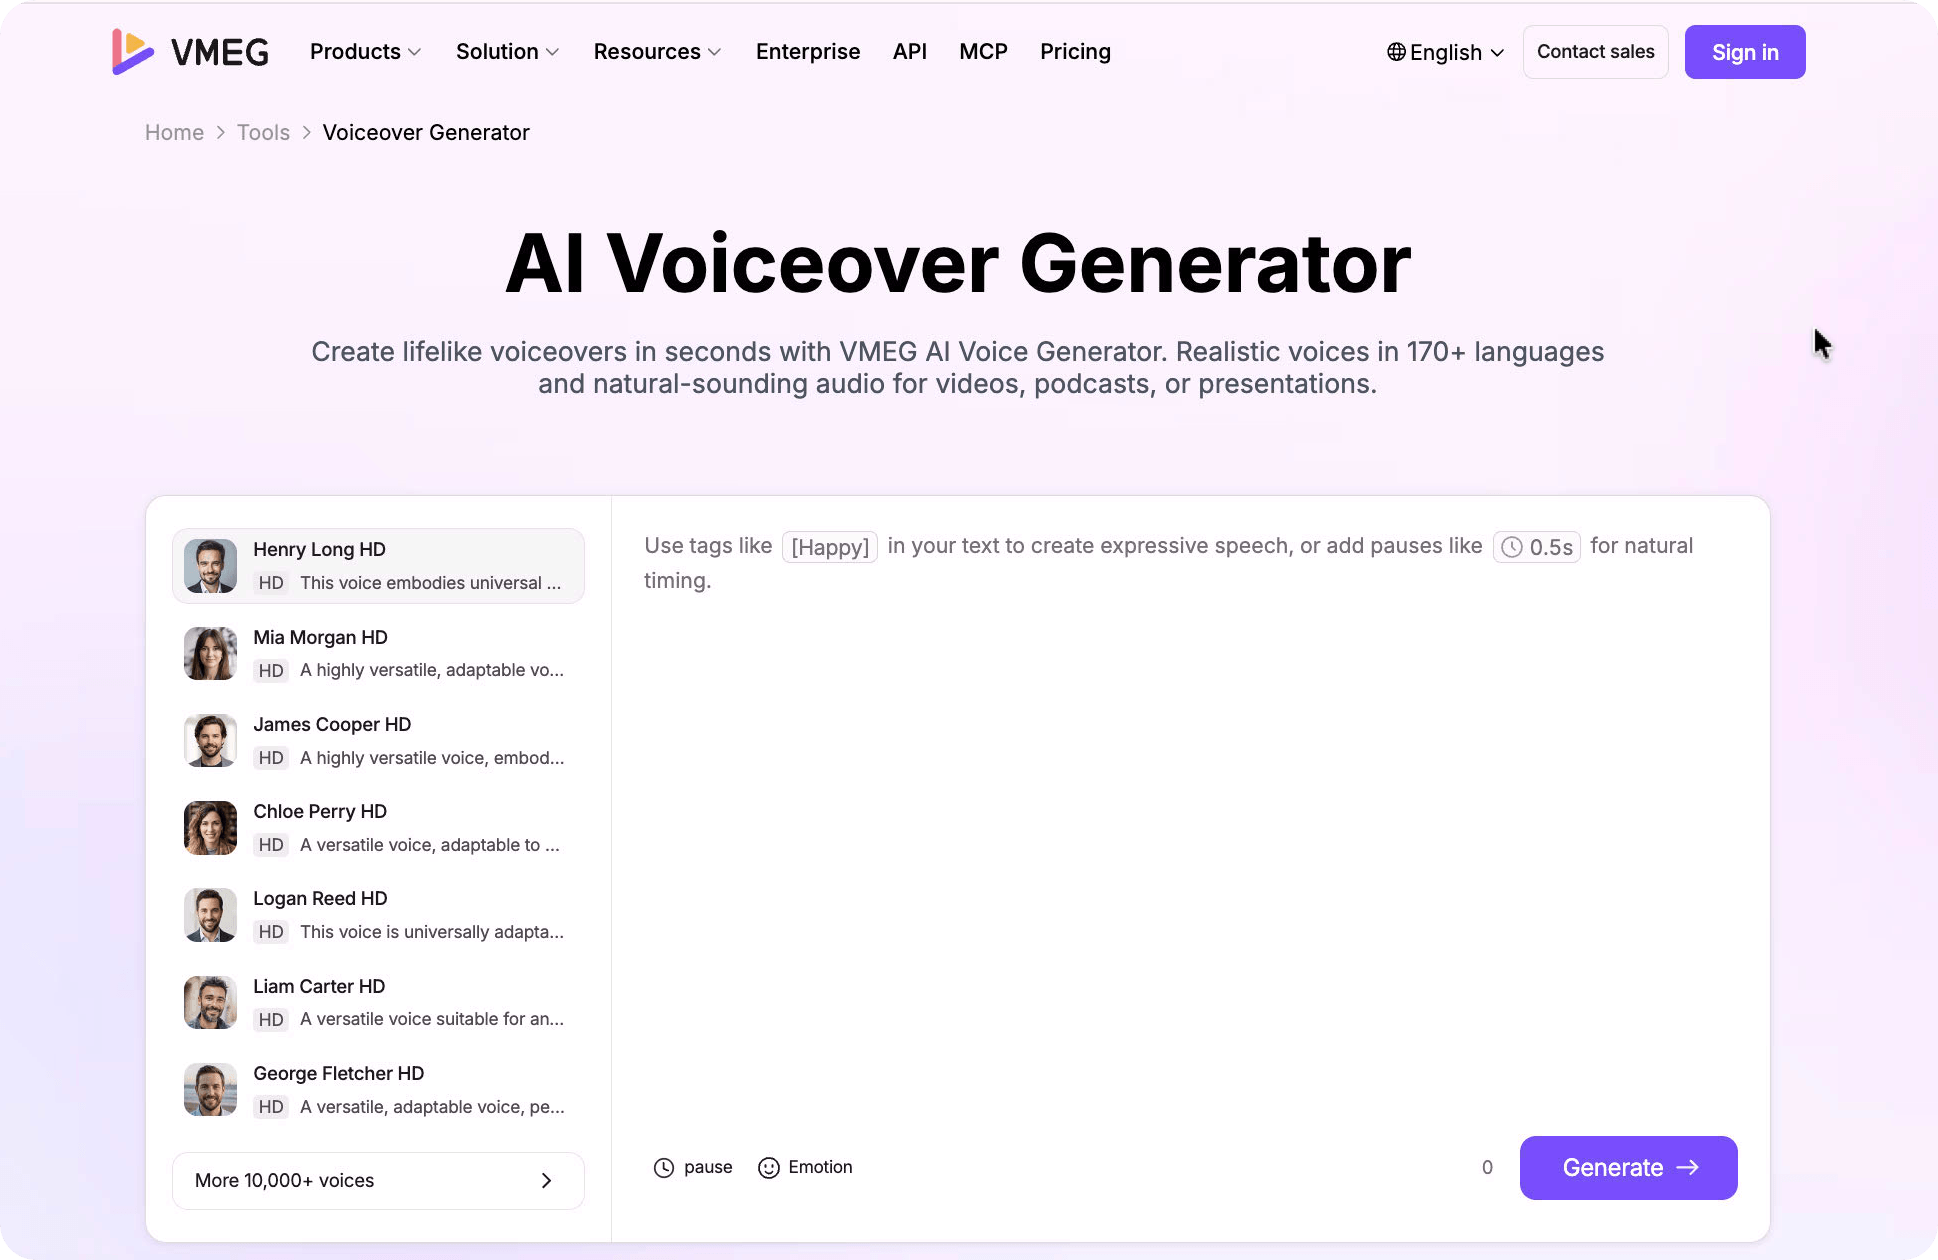
1. Create the Voice Track
Open VMEG AI Voiceover Generator, paste or type the approved script, and select the correct language. Preview several voices with the same representative paragraph so the comparison reflects your content rather than a generic demo line.
You can choose a library voice or use an authorized cloned voice when consistent speaker identity is important. Voice cloning should only be used with appropriate consent and usage rights.
2. Refine the Delivery and Download the Audio
Adjust speed, add pauses, and fine-tune pronunciation before generating the final file. Review the longest sentence, the most important name, and the section with the tightest timing. When the track is approved, download the MP3. The VMEG text-to-speech guide documents the script, voice, timing, generation, and download sequence.
The Voiceover Generator creates audio. It does not automatically perform a complex multi-track video mix.
3. Combine the Voiceover With the Video
For a simple narration-only result, open the VMEG Video and Audio Merger. Upload the footage to the video track and the generated voiceover to the audio track, arrange the files, preview the result, and export MP4 or WebM.
The merger is useful for silent footage, screen recordings, slideshows, or a video whose final audio has already been prepared. It combines the uploaded video and audio tracks; upload the audio you want in the final file.
4. Use a Full Timeline Editor for Multi-Track Mixing
If the final video needs narration, original dialogue, music, ambience, effects, fades, and detailed level automation, mix those tracks in a full video or audio editor. Export the approved mix as one audio file, or export the completed video directly from that editor.
This extra step prevents a simple merger from being mistaken for a complete post-production environment. Use the simplest workflow that still gives you control over every sound the audience should hear.
How to Make an AI Voiceover Sound Natural
Write for the Ear
Remove long introductions, stacked clauses, and phrases that only make sense on a page. Use contractions where they fit the brand voice. Read the script aloud before generating it; if you run out of breath or lose the sentence, the listener probably will too.
Direct Pronunciation, Pauses, and Pace
Spell difficult words phonetically when the tool supports it, split ambiguous abbreviations, and add pauses around important transitions. Do not slow or accelerate the entire track to fix one line. Edit that line, regenerate it, and review the transition into the next sentence.
Match the Voice to the Content
Content | Useful starting style | Avoid |
Software tutorial | Clear, neutral, measured | Exaggerated emotion that distracts from steps |
Advertisement | Focused energy and clear emphasis | Constant intensity with no contrast |
E-learning | Steady, approachable, easy to follow | Fast delivery that overloads the learner |
Documentary narration | Credible, restrained, context-aware | A promotional tone that changes the meaning |
Short social video | Concise, energetic, immediate | Long pauses before the main point |
Review the Voice in Context
A voice can sound natural as a standalone MP3 and still fail once it is combined with fast cuts, music, captions, or a visible speaker. Approve the complete audiovisual result, not only the generated audio.
How to Sync AI Voiceover With Video
Use Visual Cue Points
Mark when a button is clicked, a feature appears, a chart changes, or a title enters the frame. Align the relevant line to that cue rather than positioning the whole narration as one block. The viewer should hear the explanation when the visual evidence is available.
Split Long Narration Into Sections
Generate or divide the voiceover by scene, paragraph, or instruction. Smaller sections are easier to move, shorten, and replace. Leave brief handles at the beginning and end so clips do not start or stop abruptly.
Fix Timing Without Making Speech Unnatural
First remove unnecessary words. Then adjust pauses, move the visual edit, or hold a shot slightly longer. Change voice speed only after those options. Large speed changes can damage clarity and make different sections sound as if they belong to different narrators.
How to Mix AI Voice With Music and Original Audio
Keep, Lower, or Remove the Original Track
Use the decision made before production. If the source contains important ambience, preserve it beneath the narration. If it contains conflicting speech, remove or separate that speech before adding the new track. Do not leave two intelligible voices competing for attention unless the format intentionally uses translated voice-over.
Lower Music Under Important Speech
Music should support the message without masking words. Lower it during narration and let it rise carefully in gaps, intros, or outros. A single fixed volume may not work across a track with changing instruments or intensity, so review the loudest and busiest sections.
Check Every Audio Clip Boundary
Listen for clicks, cut-off consonants, breaths chopped in half, long empty gaps, and sudden room-tone changes. Apply short fades where needed and compare the level between regenerated lines and the surrounding narration.
Common AI Voiceover Mistakes
- Writing more words than the visuals can support. Reduce the script before forcing the voice to speak faster.
- Selecting a voice from a short demo only. Test a representative paragraph with names, numbers, and the intended tone.
- Skipping pronunciation review. Product names and abbreviations can sound plausible while still being wrong.
- Ignoring the original audio. Conflicting speech or loud music can make a clear AI voice difficult to understand.
- Using speed as the only timing control. Rewrite, split, and move clips before making large pace changes.
- Publishing without captions. Captions help viewers follow the message when audio is unavailable or difficult to hear.
- Assuming every generated voice has the same license. Check commercial terms and obtain consent before cloning a real person’s voice.
Best Videos for AI Voiceover
AI voiceover is particularly useful when the video needs clear narration but the voice is not a visible character performance. Common examples include screen recordings, product walkthroughs, training and onboarding, e-learning, YouTube explainers, faceless videos, slideshows, B-roll stories, and short social clips.
Consider AI dubbing or human performance instead when the audience must believe that a visible person or character is speaking the new words, when dialogue needs another language, or when emotional acting drives the value of the scene. For tool selection rather than production steps, see the guide to AI voiceover tools.
Pre-Publish AI Voiceover Checklist
- The script is accurate, concise, and appropriate for the audience.
- Names, numbers, abbreviations, and product terms are pronounced correctly.
- The voice fits the content and remains consistent across the video.
- Speech sounds natural without rushed lines or unnecessary gaps.
- Narration matches the relevant visuals and scene changes.
- Music and source audio do not cover important words.
- Audio starts and ends cleanly, without clipping or cut-off speech.
- Captions match the final approved narration.
- The exported video contains the new audio and plays correctly on target devices.
- Voice, music, footage, and cloning rights cover the intended use.
Frequently Asked Questions
Can I Add an AI Voice to an Existing Video?
Yes. Generate the narration from a script, import the audio as a new track, synchronize it with the footage, decide what to do with the original sound, and export a new video file.
Can I Add AI Voiceover to a Video for Free?
Some tools offer free credits or free browser-based merging, but they may limit script length, voices, downloads, video duration, resolution, or commercial use. Check the current plan and license before starting a long project.
Should I Create the Voiceover or the Video First?
Create the voiceover first when narration controls the story and pacing. Create the video first when you already have fixed footage, a screen recording, or timed visual actions. Choose one as the timing reference rather than changing both independently.
How Do I Sync an AI Voiceover With a Video?
Split the narration into sections, align each section with a visual cue, and preview the complete sequence. Shorten the wording or adjust the edit before making the voice unnaturally fast.
Can I Keep the Original Audio Under the AI Voiceover?
Yes, if your editor supports multiple tracks. Lower music or ambience beneath narration and remove competing speech where necessary. For a simple VMEG merger workflow, prepare the complete audio you want in the final video before combining it with the footage.
Can I Use an AI or Cloned Voice Commercially?
Commercial rights depend on the provider, voice, plan, and intended use. Review the current license and obtain documented consent before cloning or imitating an identifiable person. Avoid using a voice in a misleading or unauthorized context.
Final Recommendation
For a simple video, use this sequence: approve the script, create the narration with VMEG AI Voiceover Generator, download the MP3, combine it with silent footage in Video and Audio Merger, review, and export. For a project that must preserve music, dialogue, ambience, effects, or several voices, generate the voice in VMEG and complete the mix in a multi-track editor.
Test the workflow on a representative 30–60 second clip before processing the whole project. Include the hardest name, the busiest visual section, and the most important transition. If that clip passes pronunciation, pacing, synchronization, and audio-balance checks, you have a reliable production setup for the full video.