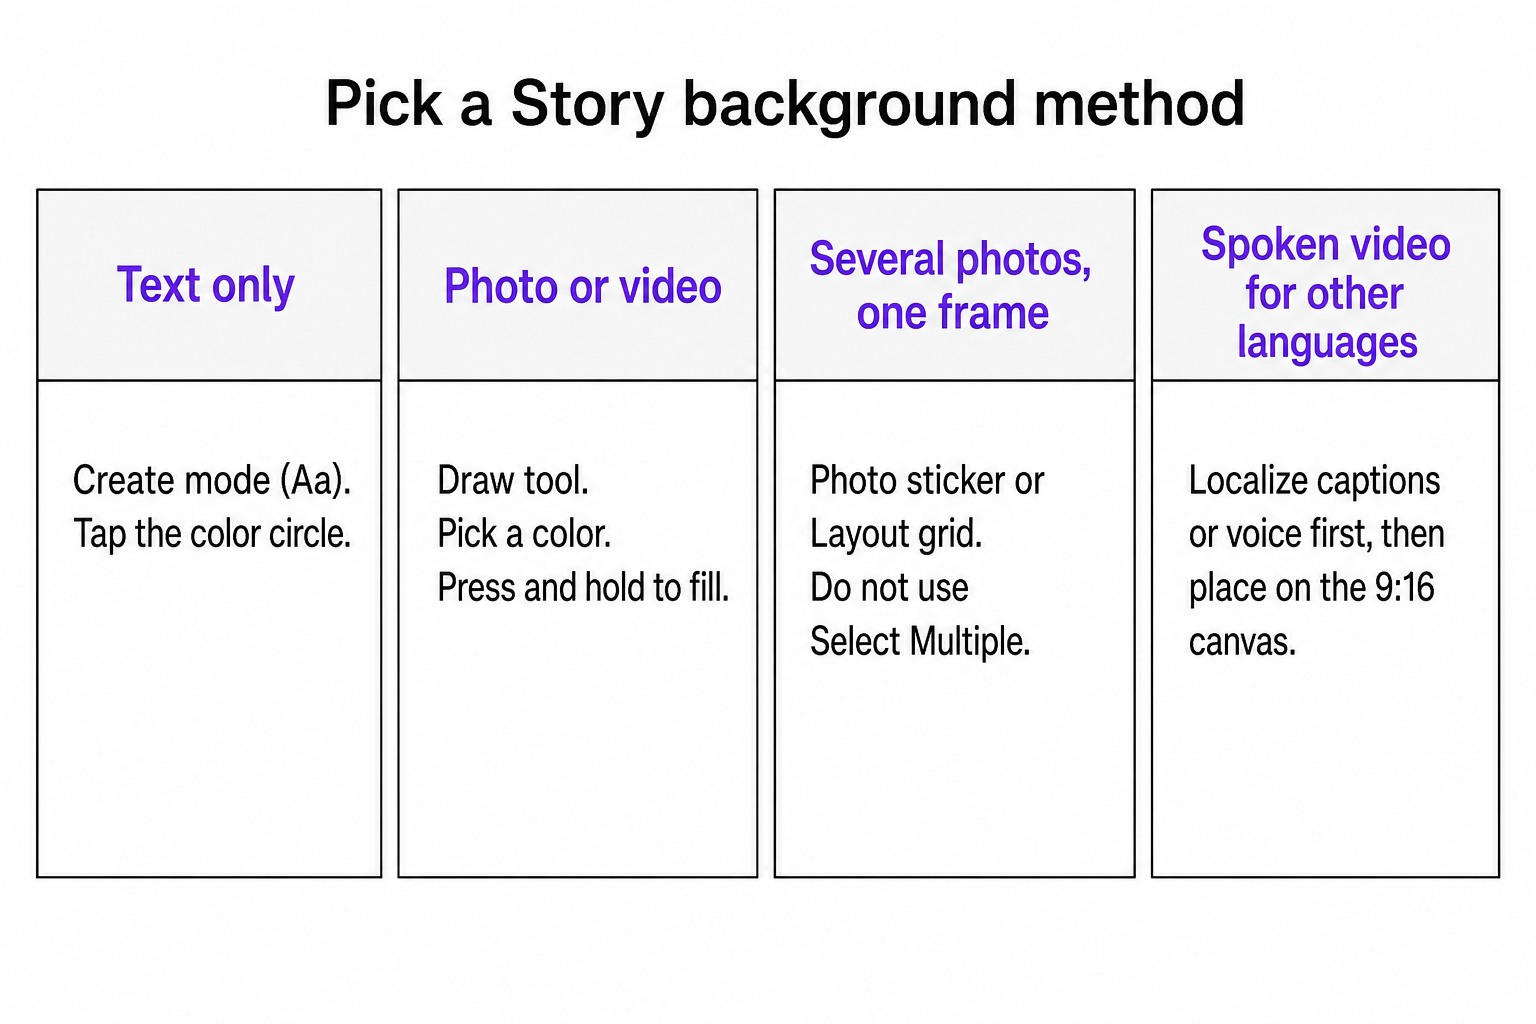
Open Instagram Stories, then pick the tool that matches the canvas. For a text-only Story, tap Create (Aa) and cycle the color circle. For a photo or video, open Draw, pick a color, and press and hold on the canvas until the fill covers the screen. If the fill hides the photo, erase a window or add the image again as a Photo sticker.
A collage is a different job from Select Multiple. Multi-select posts each asset as its own slide in the 24-hour tray. To put several photos on one frame, use the Photo sticker (or Layout) on top of a color fill. If the Story is a spoken clip you will post in another language, finish captions or a dubbed cut on a 9:16 file first, then place that file on the colored canvas so type stays readable.
Instagram moves icons between app versions. The steps below follow current help-center patterns and common editor layouts. If Draw is missing, look under the three-dot menu, then update the app.
Key takeaways
- Create mode changes the background when there is no photo yet.
- Draw plus a long press fills the canvas. Pen is closer to solid; highlighter is a tint.
- Multi-select is a sequence. Photo sticker or Layout is a collage on one frame.
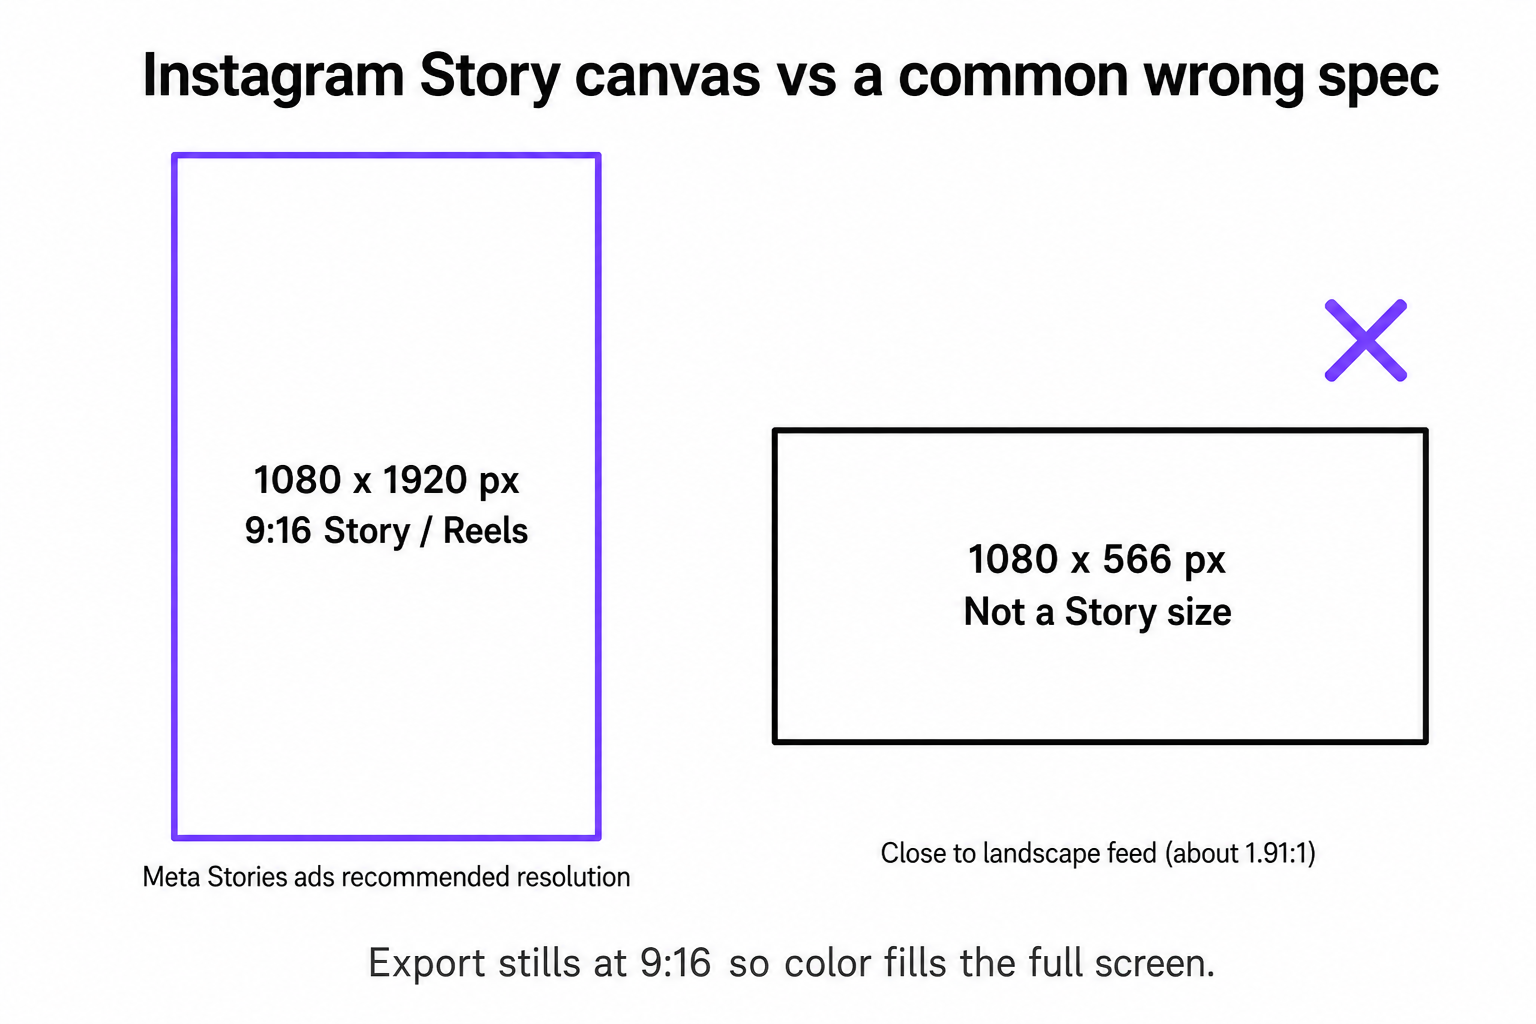
- Story stills should be 1080 x 1920 (9:16). A 1080 x 566 export is landscape, not a Story canvas.
- Keep captions and logos away from the top and bottom UI. On a colored fill, contrast matters more than the hue.
Pick the method before you tap anything
Most “background color” searches are actually three jobs: a text Story, a photo sitting on empty canvas, or several photos that should share one frame. Choose the method first so you do not flood-fill a photo you still need, or post five separate Stories when you wanted a collage.
| What you have | What you want | Use |
|---|---|---|
| Text, poll, or quote | Solid or gradient color | Create mode (Aa) |
| Photo or video already on the canvas | Solid fill behind or over it | Draw tool, then press and hold |
| Same photo, softer wash | Translucent overlay | Highlighter, then press and hold |
| Several photos, one frame | Collage | Photo sticker or Layout |
| Several photos, a sequence | Separate slides | Select Multiple |
| Talking-head video for another market | Same look, different language | Localize the file, then drop it on 9:16 |
Change the background with the Draw tool
This is the method people keep repeating in help threads: use Draw, pick a color, then tap and hold. A widely shared Instagram carousel walks through the same fill gesture on a photo Story.
- Open Instagram and start a Story (swipe right from Feed, or tap + and choose Story).
- Add a photo or video, or start from a blank canvas.
- Open Draw. On many builds that is the squiggle in the top bar, or … then Draw.
- Select the pen.
- Pick a color from the row, press and hold a swatch for a fuller slider, or use the eyedropper on the photo.
- Press and hold anywhere on the canvas until the color floods the screen.
- Tap the check to leave Draw, then add text or stickers.
If you uploaded a photo first, the fill sits on top of it. That is expected. Use the eraser and the size slider to scratch a window back to the photo, or skip the eraser and add the photo as a sticker on top of the fill. Undo is in the top bar if the fill misfires.
Highlighter uses the same long-press fill, but the wash stays translucent. A second or third long press usually darkens it. Stop when the photo is still visible and the text you plan to add will still read.
Change the background in Create mode
Use Create when the Story is type-first: an announcement, a question, a poll, a countdown.
- Open the Story camera.
- Tap Aa / Create on the left.
- Tap the color circle (usually bottom right) to cycle Instagram’s backgrounds.
- Add text and stickers.
- Post, or save the frame if you reuse this layout.
Create mode does not give you a full photo editor. If you need a product still on a brand color, fill first with Draw (or Create), then add the still as a Photo sticker.
Put a photo on the new color (collage, not multi-select)
Yes, you can put several photos on one Story. The trap is Select Multiple, which sends each file out as its own slide.
Two native ways keep everything on one frame.
Photo sticker (freeform collage)
In the Story editor, open stickers and look for the photo / gallery icon. Pick an image from the camera roll, pinch to resize, drag to place, and tap the sticker to cycle shapes if your build offers them. Repeat for the next image. This matches the high-vote sticker answer: search the camera roll from the sticker tray.
Copy and paste (useful on iPhone)
In Photos, copy the image. Return to the open Story, open the type tool (Aa), press and hold, then tap Paste. Treat the pasted image like a sticker: size it, move it, add the next one. Android copy-paste is less consistent; if Paste never appears, use the Photo sticker instead.
Layout (grid)
On the Story camera, open Layout (grid icon on the left on many Android builds; iOS placement varies). Pick a grid, fill each cell from camera or camera roll, then add type. Layout is for a tidy grid. Photo sticker is for overlap and a scrapbook look.
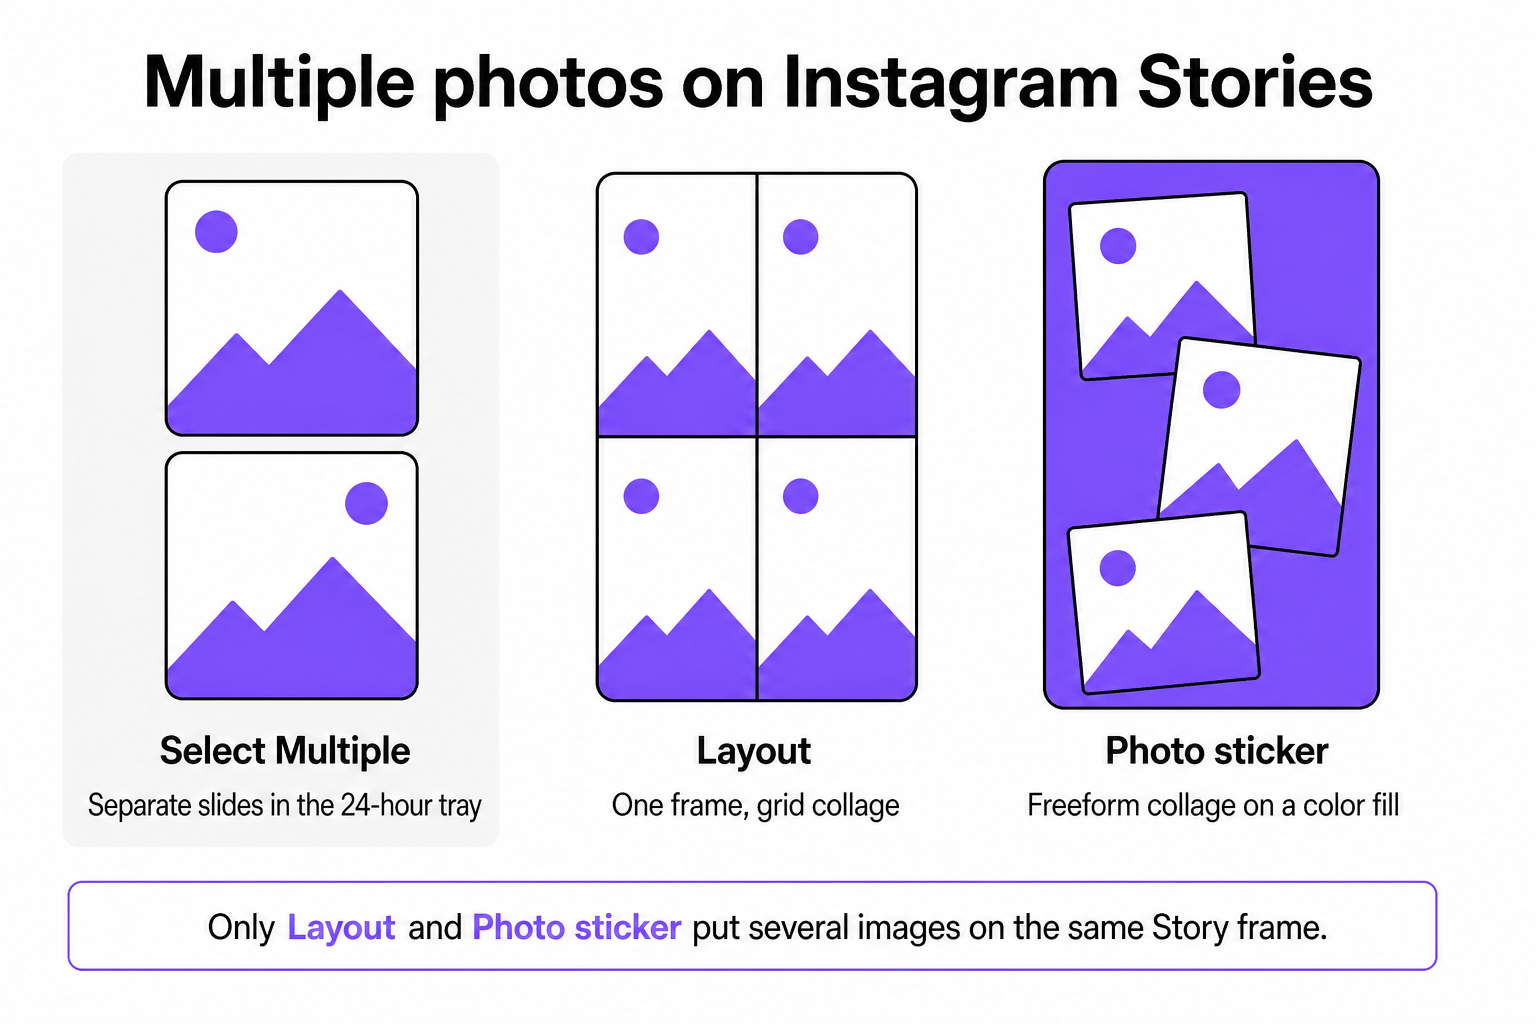
Do not use Select Multiple when you want a collage. You will get a row of single-image Stories, not one composed frame.
Match a brand color without guessing
Instagram’s default row is not a brand book. A practical workaround used by social teams:
- Save a palette screenshot (or a product photo that already has the hex you need).
- Add it to the Story as a Photo sticker.
- Open Draw, use the eyedropper on that sticker, then long-press to fill.
- Drag the palette sticker to the trash.
- Add the real photo, logo, or text on top.
The fill is only as accurate as the screenshot and the screen’s color pipeline. For paid 9:16 units, export from a design tool at 1080 x 1920 and upload that file as the Story background instead of sampling in-app.
Use the right canvas size
Meta’s Stories ads spec recommends 1,080 x 1,920 at 9:16, with a minimum around 600 x 1,067. Organic Stories use the same full-screen vertical frame. A landscape still leaves leftover canvas, which is why people reach for Draw in the first place.
One widely ranked how-to lists 1080 x 566 as a Story spec. That ratio is close to a 1.91:1 landscape feed image, not a Story. If you export at that size, Instagram will letterbox or crop, and your “background color” becomes a fight with empty bands.
For ads and branded templates, Meta also defines a Safe Zone for 9:16 Stories and Reels: keep text, logos, and key art off the edges so profile chrome, reply fields, and CTA stickers do not cover them. Creative guidance for Stories ads is to leave roughly the top 14% and bottom 20% clear of essential elements. Organic Stories have similar UI, so the same placement habit helps even when you are not running ads.
When the fill, color, or collage fails
The color will not stick, or Draw does nothing. Update Instagram. On some versions Draw is under …; on others it is a top-bar icon. Close the editor and start the Story again if the long press never floods.
The fill covered the photo. That is the fill working. Erase a window, or add the photo as a sticker on top. Do not keep long-pressing hoping the photo will punch through.
You cannot recolor a reshared post the way you recolor your own still. Instagram often sets a gradient behind a shared Feed post or Reel sticker. You can still Draw-fill around it, or add your own color Story and paste the post sticker on top, but the nested post keeps its own frame.
The collage posted as five Stories. You used Select Multiple. Use Photo sticker or Layout on a single canvas.
The posted color looks duller than the editor. Compression and display differences shift some hues. If the color is a brand constraint, export a 9:16 PNG from a design tool instead of sampling in Draw.
Captions vanish into the fill. White type on a pale yellow fill, or burned-in subtitles that sat on the original video, will fail after a flood fill. Change the type color, add a text background, or keep the video’s lower-third in the Safe Zone before you fill.
If the Story is a video with speech
A color fill is a design step. It does not translate dialogue. If the asset is a talking-head clip, a product demo, or a voiceover you will reuse in another market, treat language as a separate pass:
- Keep a 9:16 master (1080 x 1920).
- Generate a transcript and captions, or a dubbed / TTS track, in the target language.
- Check that captions still contrast against the new fill and sit inside the Safe Zone.
- Export the localized file, then place it on the Story (as the full-frame video, or as a sticker on a brand-color canvas).
VMEG’s Instagram Video Translator is for that language pass: upload a clip or paste a share link, then review subtitles or voice before you post to Stories. If you only need the speech as text, start from how to transcribe Instagram videos. For a wider set of Reels-to-Stories workflows, see how to translate Instagram videos.
Do not run a flood fill on a localized video until you have checked burned-in captions. A solid Draw fill will hide them the same way it hides a photo.
FAQ
How do I change the background colour of a Story?
Same steps as above. Create mode for text-only. Draw, pick a colour, press and hold for a photo or video.
Can I add multiple photos as a collage instead of multi-select?
Yes. Multi-select makes a sequence. For one frame, use the Photo sticker (or copy-paste on iOS) on a color fill, or Layout for a grid.
Does the Draw fill work on video?
The long-press fill covers the canvas, including a video layer. Use eraser or a sticker-sized video if you still want the clip visible.
Do I need Canva or another design app?
Not for a solid color or a simple sticker collage. Use a design tool when you need a repeatable 1080 x 1920 template, a cutout, or a brand file you will post many times.
Solid color, tint, and sticker collage are all native. Choose Create or Draw for the fill, Photo sticker or Layout when several images must share one frame, and a localized 9:16 file when the Story has to be understood in another language.